Repair
Note: If you are looking for a service to repair your Victor or Victrola phonograph, please check-out our Recommended Repair Services page.
Most phonograph repairs can be performed by the competent handyman, and many online resources exist (including some YouTube videos) which cover the subject very well. However, since there are so many different variations in Victor's motor designs, the process of covering all the possible repair configurations goes far beyond the scope of this website. Eric Reiss' book "The Compleat Talking Machine" (which is still available via online sellers) is a great place to start. Details may be found in our LINKS AND REFERENCE MATERIAL section. However, readers are warned that some of these repairs require great care and can be incredibly messy. Old spring grease, which consists of graphite and Vaseline, is nearly impossible to remove from springs and components unless some type of a solvent-filled degreasing tank is available. The process of teardown, cleaning and rebuilding will inevitably result in a huge mess. And once that 100 year old grease gets on your skin and clothing, you might as well plan on wearing it for quite a while. In addition, unless great care is taken, springs can easily fly apart, causing bodily injury as well as damage to the surroundings.
As a general process:
A good starting point for making repairs is to refer to the original owner's manual, which will give you pointers on removing the motorboard, basic lubrication, etc. If you don't have a manual, a copy for one of the most common models is provided here.
To gain access to the spring motor
for repairs or lubrication, the entire motorboard must be removed (in most
cases). To begin, remove the crank by winding it BACKWARDS a few
turns, and it will pull straight out. Remove the turntable by lifting it straight
up. If it is stuck, you can use a small piece of wood held across the top of the
turntable to put downward pressure on the center spindle while lifting upwards
on the bottom edges of the platter. If necessary, have someone gently rap on the
spindle with a
rubber mallet while you are pulling upwards. It will eventually come off.
Remove the soundbox by turning it clockwise 1/4 turn (while facing the
front) and it can then be pulled straight off the tonearm. Push the tonearm
to the far right to clear the motorboard. Then loosen the holding screws around the motorboard
(there will be either two or four screws clearly visible at the corners. If
the phonograph has an automatic brake, slide the y-shaped brake mechanism
(visible with the turntable removed) toward the center such that the yoke is
positioned directly over the motorboard (and nothing is hanging out beyond
the edge). Lift the motorboard out using the small lifting knob (in most
cases) located toward the front. Some motorboards will pivot upwards from
the front via a spring-clip support toward the rear. In this case, pivot the
motorboard up from the front, and then pull it straight toward you to
remove. It will take quite a tug to break out of the
spring clamps. Other motorboard designs simply lift straight upwards, but you may need
to "maneuver" the motorboard a bit to clear some of the protruding
components from the cabinet. 4 spring motors are very heavy, and it can be a
chore to get them out.
 The
low-cost tabletop models of the mid-1920's can be serviced simply by turning
them upside down; there is no removable motorboard on these machines.
The
low-cost tabletop models of the mid-1920's can be serviced simply by turning
them upside down; there is no removable motorboard on these machines.
The motor is removed from the motorboard by either 2 or 4 large screws that usually tap straight into the motor frame. If your Victrola has a speed indicator, then you must remove the indicator needle before pulling the motor. This is accomplished by removing the indicator bezels and the "pie-shaped" needle cover, and then using a pair of needlenose pliers, remove the tiny nut on top of the indicator needle pivot. Hold the needle with one hand and simply unscrew the nut with the pliers. A washer will be seated underneath, which also must be removed. Don't drop or lose them, finding replacement parts can be a problem! Then simply pull the indicator needle straight upwards to remove it.. You may need to use the needlenose pliers to assist in the needle removal process. Use great care, as the needle can easily be bent or damaged
In summary, about 9 out of 10 problems that one will encounter with an old phonograph motor is caused by hardened mainspring grease. As a general rule, if the motor spins slowly, stalls, or thumps and bangs loudly while running, then the spring(s) likely need to be removed, cleaned and lubricated. The mainspring assemblies were originally packed in a graphite/Vaseline grease when new. After 100 years, the grease typically becomes hard as a rock, and can cause a number of different problems in operation. The only way to rectify this situation is to pull the motor completely apart and remove all the mainsprings (no small task), perform a thorough cleaning, and reapply grease. Then the springs have to be wound back into the barrel; the rewinding process is tricky. It must be done in the correct order, and in the correct direction. Each removed spring must be inspected along its entire length for corrosion or hairline cracks. A small fracture in the spring, or permanent corrosion on the spring surfaces will require replacement of the entire spring itself, and unless you know what you are looking at, you could very well spend hours doing a teardown and rebuild, only to discover that the phonograph is still not working correctly when finished. These tasks certainly aren't impossible for the home handy-person to tackle, but it is a real mess, and requires a few attempts before getting it right. And there may be up to 4 mainsprings in the motor, which usually all require cleaning and lubricating. There are a few YouTube videos available online to address the subject, although we have not vetted any of them for correctness. While plenty of hobbyists are successful at motor rebuilding, it has been our experience that having an experienced repair service handle it (often using ultrasonic cleaning tanks and with the equipment to easily rewind springs) is well-worth the money expended.
One of the big mistakes that new collectors often make is to start tearing apart a phonograph motor without realizing that the mainspring(s) may still be under tension, even though the motor isn't spinning. For example, if the grease has hardened inside the spring barrels, and the springs are wound-up and stuck against each other, one might assume that the springs are unwound and it is safe to start tearing everything apart for an overhaul. What CAN happen is that considerable spring tension is still present in the barrels, and as soon as one component (a gear or shaft) is removed, all that built-up tension "lets go" suddenly with a "BANG", and the novice repairman ends up with a bloody, crushed finger (or worse).
If the motor makes a loud "machine-gun" sound while running, the governor weights have likely come loose, and should be repaired immediately before further damage is done. There should be 3 governor weights in all Victor spring motors, and these are held to the shaft assembly via leaf-type springs. Governor mechanisms sometimes come apart over the years, usually because someone turned the speed control up too high, and the resulting centrifugal force on the governor weights caused overstress on the springs. . If the springs come loose, or the weights become detached, the motor will no longer function properly, or may "race" at an uncontrollably fast speed. This will likely require replacing some broken governor springs. We don't recommend that you try these repairs yourself without some good coaching.
FOR ELECTRIC MOTOR VERSIONS: The turntable for an electric Victrola (VE) should not be 'forced' to spin. If the machine is not operating when powered-up and the brake-tab-switch is turned on, then the problem could be electrical (failed voltage-dropping resistors in the rear of the cabinet) or mechanical (motor commutator dirty). Bad internal connections are also common. Servicing these systems can be complicated, and should be done by competent technicians. When the motorboard is removed, most systems have two Bakelite connectors (one at the motor, another at the power switch) which must be separated in order to remove the motorboard. From there, a voltmeter can be used to determine if power is available at the motor. Most AC motor systems in early phonographs operate at 32 volts AC.
Soundboxes: if the phonograph sounds distorted, buzzes or squawks when playing a good recording, it's probably time for a soundbox rebuild. The rubber gasket surrounding the mica diaphragm should be soft and compliant. If it is brittle and/or cracked, it should be replaced. It is easy to damage the mica during teardown, and properly aligning the stylus bar requires a bit of skill. A complete rebuilt involves teardown, replacing the gasket, re-waxing the needle bar-to-diaphragm connection, complete cleaning, replacement of the rubber sealing gasket at the neck, and then re-aligning and tightening the components. It's really easy to make mistakes and ruin the diaphragm, so use great care if you try it yourself.
Cabinets: if the finish is frazzled, the veneer is bubbled, or Fluffy The Cat has been using your Victrola as a scratching post, it may be time to refinish it. Before you tackle this task, please carefully read the "REFINISHING" section to assure that you don't lessen the value of your phonograph. This page also covers the cleanup and refurbishment of phonographs with good original finishes.
If you need parts or needles, please contact one of the companies listed in the "PARTS SUPPLIERS" Section. We don't sell parts.
There were scores of different motor designs and configurations used by Victor over the years. We regret that we are unable to answer "how do I fix it?" questions, or to provide individual repair/servicing instructions for each type of motor. This is due to the fact that we receive over 100 inquiries daily on this topic, and that our operations are related to historical research and not mechanical repairs. Please refer to our RESOURCES section for books on repair of phonographs.
Basic Troubleshooting Chart:
| Symptom(s) | Probable Cause(s) | Repair Required |
| Crank turns freely; does not wind motor | Broken Mainspring(s) | Remove and Replace Mainspring |
| Winding gears or sprocket damaged | Replace Gears | |
| Motor makes loud "thumping" noise or bangs occasionally during operation | Hardened grease in mainsprings | Remove, clean and grease mainspring(s) |
| Crank will only wind a few turns before stopping | Hardened grease in mainsprings | Remove, clean and grease mainspring(s) |
| Broken mainspring | Remove and Replace Mainspring | |
| Motor "stalls" or slows while playing back a record, even when fully wound | Hardened grease in mainsprings | Remove, clean and grease mainspring(s) |
| One or more broken mainsprings | Remove and Replace Mainspring | |
| Hardened grease on drive gears | Clean and grease drive (worm) gears. | |
| Lack of lubrication on governor | Oil governor mechanism, check bushings for looseness | |
| "Machine Gun" sound during playback | Governor mechanism damaged or springs broken | Repair governor |
| Motor runs well, but speed is unsteady | Governor mechanism out of adjustment | Adjust governor, check position of spur/worm gear interface |
| Hardened grease in mainsprings | Remove, clean and grease mainspring(s) | |
| Speed control adjustment does not work at all | Governor mechanism needs oil or out of adjustment | Lubricate or adjust governor |
| Crank frozen (will not turn) | Broken (jammed) mainspring | Remove and Replace Mainspring |
| Winding gears or sprocket damaged | Replace Winding Gears | |
| Hardened Grease in mainsprings | Remove, clean and grease mainspring(s) | |
| Grinding sound | Drive or governor gears worn or out of adjustment | Adjust or replace drive gears |
| Playback sound is harsh and/or "rattles" | Soundbox gasket hardened | Replace soundbox gasket |
| Soundbox is loose on tonearm (won't remain stationary) | Worn or deteriorated soundbox seating gasket | Replace gasket |
| Tonearm is loose on rear support bracket | Mis-adjusted tonearm support | Tighten or readjust tonearm support screw(s) |
| Broken or cracked pot metal bracket | Replace cracked bracket |
Recommended Lubricants
A good quality lithium grease, applied in moderate amounts, works well for lubricating gears and mainsprings. For bearings and bushings, a high-quality sewing machine oil works well.
Motor detail:
The example below is typical for most Victor motors; there are some variations, depending on age and model. However, the basic layout and function is very similar.
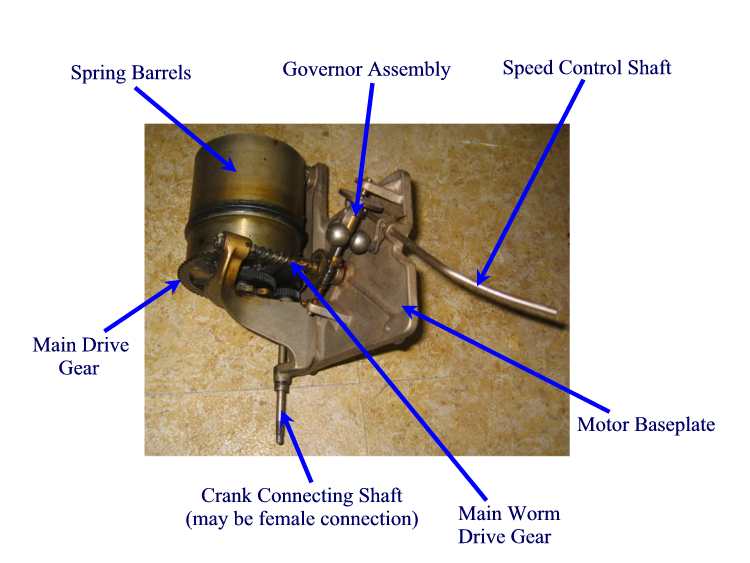
Typical "as found" (uncleaned) Victor Motor, removed from the wood motorboard. This is a 3 spring version, often found on the more expensive external horn models or early Victrolas. There are 2 springs in the large barrel and one in the smaller barrel. They are wound in opposite directions! Mainsprings must be removed from the barrels to be cleaned and lubricated, which entails removing each barrel assembly from the arbor, removing the barrel cover, and gently pulling out the mainsprings. Heavy gloves, arm, chest and face protection is strongly advised, as the springs can readily "fly" out of the barrel, causing severe cuts. Replacing the springs properly requires following a detailed procedure, which is beyond the scope of this discussion.
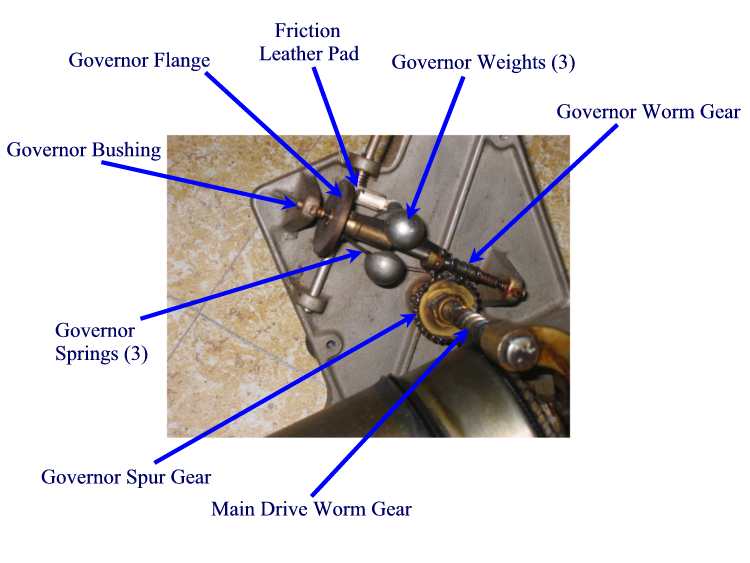
Detail of Governor Components. Note hardened grease on gears, which must be cleaned for proper operation. It is also essential that the governor spur gear be properly mated with the governor worm gear. This adjustment is performed by loosening the small bushing screws, and sliding the entire governor assembly back and forth in the bushing supports until the proper mesh is achieved (e.g. smooth, quiet operation).
Many repairs are simple, but we can't possibly respond to repair questions or to provide detailed instructions.